 |
Loading A BASIC Listing
into Win994a
|
The below exercise will take you step by step on how to load a Basic listing by using two very fine programs. The
programs we will be using are TIDIR by Frederick G. Kaal and Win994a Simulator by Cory Burr.
You can download these programs by following the links below:
Go here to download TIDir from ftp.whtech.com. TIDir
Go here for more information about Win994a and to download it. Win994a
You can download the disk we will be working from ftp.whtech.com
here.
If you wish to follow step by step create a folder on your drive named EMULATOR, in this folder you will place the
the disk file 99ER2-1.DSK. You will also unzip TIDir into this folder.
You will actually install Win994a and it will create its own folders, and place icons on the desktop.
It might look like a lot of steps but after you try this once you will probably be able extract a listing, import it and
run it in just a few minutes.
It is best to go ahead and turn your Caps Lock key on, as in the real TI you will need all caps when
you do any work at the Win994a command prompt. In other words, if you type this at the command prompt:
merge dsk1.microjaw_x
You will get an error. It needs to be typed in using all upper case characters as shown below.
MERGE DSK1.MICROJAW_X
|

Using TIDir to extract a BASIC listing
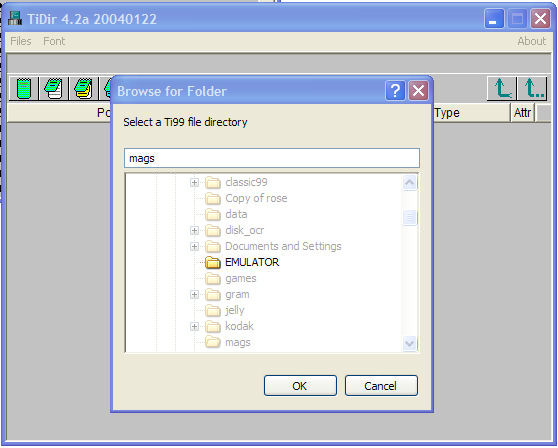
When you star TIDir you presented with a "Browse for Folder" box, and just point at the folder where you have your DSK files.
I will be choosing the folder named emulator, since this is the folder where I placed my DSK file.
|

After choosing your folder above you should see the DSK file that you have downloaded. In my screen shot you will also
see two other files, tidir.exe and tiDir.ini. These are the TIDir files, and this folder just happens to be where I unzipped
them.
99ER2-1.DSK happens to be one we are working with so I will now double click on it.
|
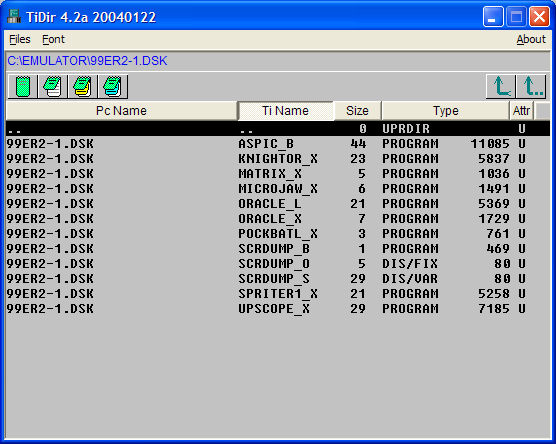
Through magic and elfin lore we are now presented with a listing of all the files contained in our disk. The file we
are working with in this exercise is called MICROJAW_X. The X at the end of the name means (at least in 99er speak)
that this program requires Extended Basic.
Before we move on notice the four notepad type, green buttons near the upper left.
 | View File or DSK info | |
 | View File or DSK contents | |
 | Extract File from DSK | |
 | Convert File to pc TXT File | |
The button we are intrested is the View File or DSK contents
Go ahead and click this button and you should be presented with the screen shown below.
|
Ok, now this is cool! There is the whole listing that used to take hours and hours to type in, debug etc... reading
from the tiny print and jumping all over the magazine while trying to find some way to prop up the magazine which
seemed to have a life of its own and with just two lines left to go it starts to thunder and the lights flicker
a bit and you realize that you probably have about 1 minute to save all this work before the power goes off, and
you look down and realize that your 9 year old son has "borrowed" your cassette player again to spy on his sister and then
the only thought that comes to mind is MUST SAVE FILE!!!! so up you go, tripping on your cat who was relaxing next to you,
find the cassette player, hurry back, and notice
Tabby your cat, who you accidently kicked halfway across the room during your hurried exit, next to your keyboard which is now, yep you guessed it, AT THE TITLE SCREEN!!!! ARRRRRGGGGGGG!!!! whoops.. sorry..
well, I think you get my point.
Now click on "File" located on the top menu bar, and choose "Save As", and you will see the screen below.
|
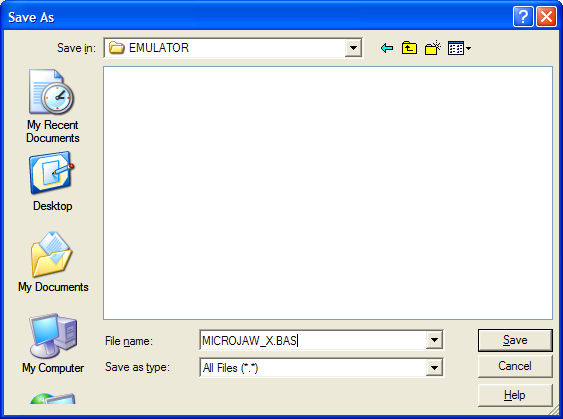
We will now need to change the file extension on this file before we click the "SAVE" button. Change the "Save as Type" to
"All Files (*.*). Then click in the "File Name" box and change the extension from .TXT to .BAS, then click the save button.
For continuity save this .BAS file in the emulator folder.
Ok at this point we are now ready to move this file listing in the Win994a Simulator, the instructions for those steps are
below.
|
Using the Win994a Disk Manager
After installing Win994a you should have an icon installed on the desktop called Win994a Disk Manager. Go ahead and
double click on this icon and start Disk Manager.
When you start the Win994a Disk Manager you will be presented with the screen shown below.
|
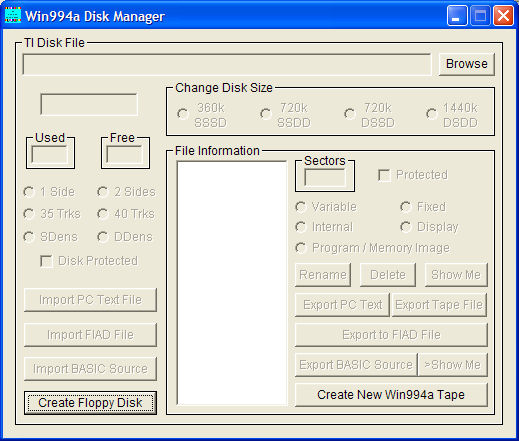
The first step on creating our disk is to click on the "Create Floppy Disk" button located in the lower left. The
"Create New Win994a Disk" box will now open.
|
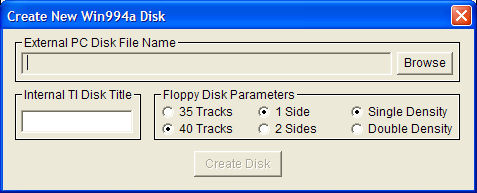
Ok this where we will create our disk. Think of this step as the similar to formatting a floppy in a drive. This is where
you set the options for what type of disk you wish to create. For our exercise we will just leave the options at the
default settings, which happens to be a 40 track, single sided, single density drive. Another step we will need take is to
give the disk a name (just like when we format one). Fill in the "Internal TI Disk Title" text box with a name of your
choice, we will choose TESTDISK.
Next we will need to click the "Browse" button which is where we choose where to save our "Disk" to the harddrive.
This file needs to reside in the
folder ....burrsoft\win994a\Disks\ but that is where this tool will put it by default. After clicking the "Browse" button
type the name you wish to name the file. Since I am such an imaginative person I named mine TEST, when you click the
"Save" button the program will add the TIDisk file extension for you.
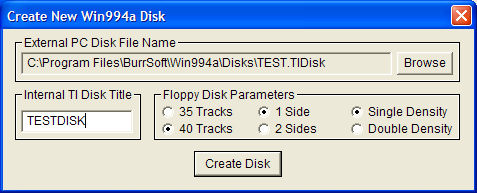
Now we have the ability to click on the "Create Disk" button, and when we do we will return to the "Disk Manager" screen
shown below.
|
Now we will need to load our recently created disk back into the disk manager. Click on the Browse button and
choose the disk we just created which will be called TEST.TIDisk. After opening the disk our disk manager should
look like the screen shot below.
|

Now we have our floppy loaded into our disk manager. At this point the floppy is empty, but we have one and it is formatted.
We will now load our listing we created earlier with TIDir into our floppy. We start this process by clicking the
"Import BASIC Source" button.
|
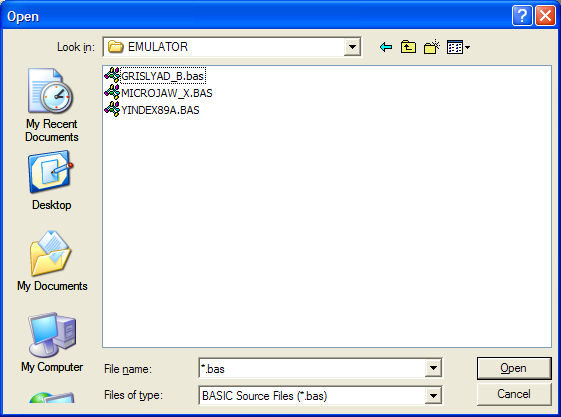
Another window opens, and we use this to open our file .BAS file we saved earlier using TIDir. Navigate to where you saved
this file (I saved mine in a folder called EMULATOR. And there it is... MICROJAW_X.BAS. Just click on this file and
click the open button.
A text box will pop up as shown below.
|
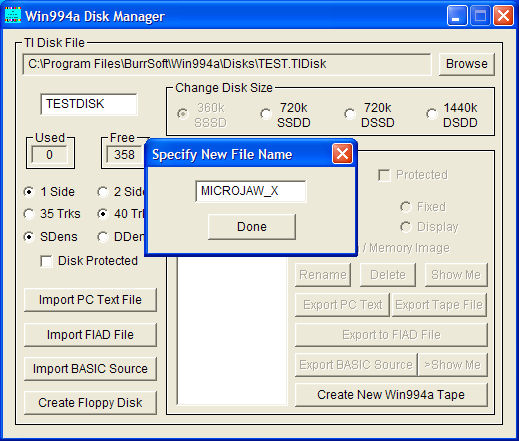
We will use this box to name the file as it will show up on the disk. This will be the TI file name. I named mine,
MICROJAW_X. After typing the file name click the done button. You should see MICROJAW_X in the file information box. You
can add other files to this disk, and the "Used" "Free" boxes will show you how much space you have remaining on this
paticular floppy.
You may now close the Disk Manager as we are now are ready to run this listing in the Win994a Simulator.
|
Merging a BASIC Listing
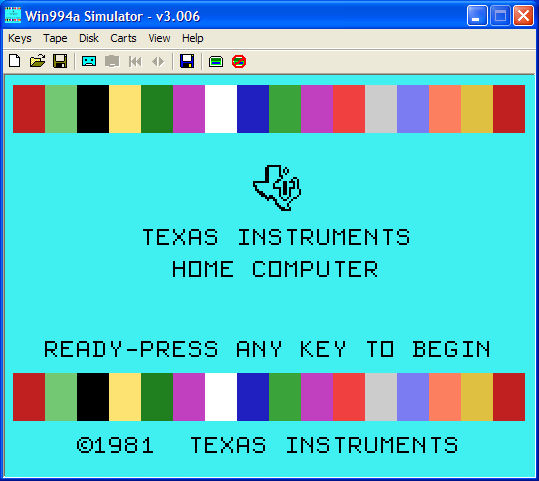
We are now ready to actually run our Basic listing. Start Win994a and you should be presented by the screen
shown above. Yours
may be showing the info panel to the right. You can turn the info panel on and off by choosing this option under the
"View" selection on the top menu bar.
|

We will now want to insert the disk we created earlier. First though we need to make sure that we have the Extended Basic
cartridge installed. You do this by choosing "Carts" from the top menu bar and choosing "TI Extended Basic.TICart".
Now choose "Disk" from the top menu (see picture above) and then choose "Insert Floppy Disk". The box shown below will
present itself.
|
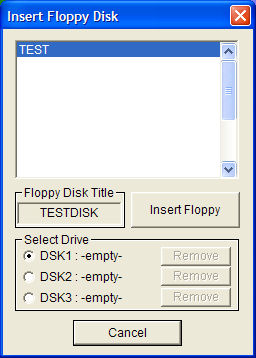
We are looking to load the floppy named TEST. Then choose DSK1, and click the "Insert Floppy" button. We now have the floppy
inserted that we have imported our listing into. If you are not at the title screen, then choose "Keys" from the top
menu and click "F10 Quit" and this will reset the screen. At the title screen hit any key, and then choose
2 FOR TI EXTENDED BASIC.
|
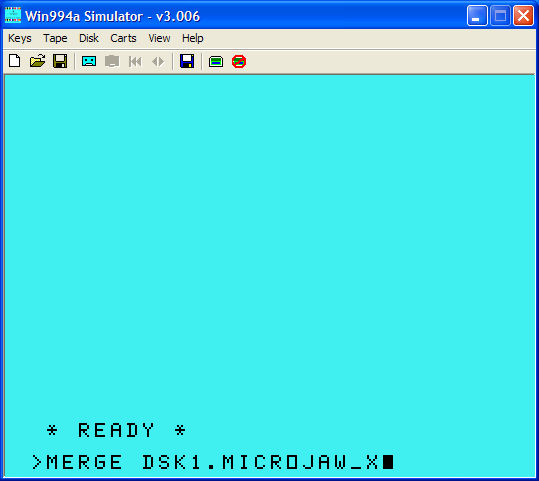
At the prompt type MERGE DSK1.MICROJAW_X and hit enter. This could take anywhere from a few seconds to several minutes
depending on the speed of your computer and the length of the listing.
When you return to the prompt, type run and you should see your program running! See screen shot below.
|
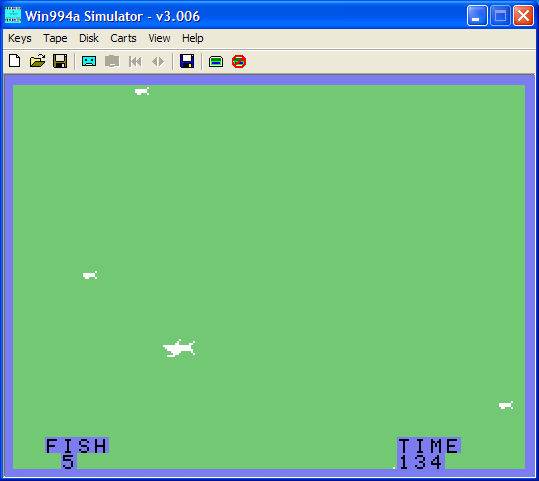
The above program was written by Sam Pinucs, and the listing appeared in the 99'er magazine. Ok, you can play this later,
right now lets actually save this back to the disk, and then we will not need to merge it again.
|
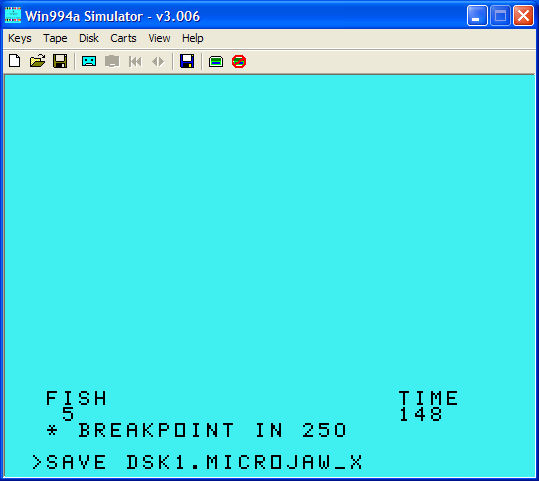
Choose "Keys" from the top menu and then choose "F4 Clear", or just hit the F4 key on your keyboard. At the prompt type:
SAVE DSK1.MICROJAW_X
and hit enter. You have now saved the file
on the floppy in it's native form and you will not need to merge it again.
To load this file from the floppy now all you need to type at the prompt is:
OLD DSK1.MICROWJAW_W
and the program should load right up.
That's it!
I glossed over a lot of the other great features of both these programs, but my goal here was just to show you how
do this one exercise. Feel free to experiment, and be sure to read both help files that come with these programs
to get the most out of them.
|
