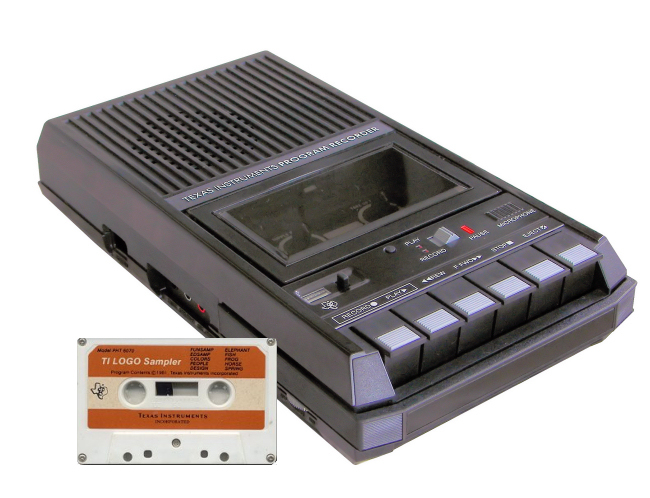
A Beginner's Guide
to Cassette Operation
with a Home Computer
by Samuel D. Pincus
You bought your TI-99/4A Home
Computer because the plug-in
Command Modules looked like a
quick and easy way to get started. You
played the games anti typed in the programs that you found in the Users
Reference Guide. Now comes the
moment of truthŚWhat to do next?
The answer, fellow 99Æers, is easy:
Learn how to use a cassette tape recorder with your computer so that you
can begin to build up a program library
by recording and saving the many
excellent software programs that appear
printed in 99Æer Magazine.
In order to get started youÆll need
a tape recorder cable, a cassette tape
recorder, and some good quality cassette
tapes. The cable assembly is specially
manufactured for Use with the Tl-99/4A
Home Computer (Dual Cassette Cable,
PHA2000) and should be available
from any TI retailer. Cables made for
other computers will not work with
your machine.
When it comes to locating a tape recorder, the matter isnÆt as straight-forward: TI does.. not manufacture a
special tape recorder for use with their
computer and really doesnÆt recommend
any one particular brand. There is a
good reason for this, because finding a
recorder, that provides satisfactory results is not as easy as youÆd think.
To explain Why, I will have to give you
a quick background on how a computer
talks to a tape recorder and vice versa.
The first thing that you must realize
is that a computer is very, very dumb!
While your brain can understand things
like ōyes,Æ ōno,ö and ōmaybe,ö a computer only understands ōoffö and ōon.ö
Everything, that a computer does is
based on the fact that it understands
only these two things.
What the Recorder Records
In order to do the wonderful things
your computer is capable of doing, the
ōoffsö and ōonsö have to be arranged
into patterns that the computer can
use. This is true not only for numbers,
but for letters as well. For example,
if you type in the letter ōAö on the
keyboard, your Tl-99/4A really sees
a pattern that looks like this: on-off
off-off-off-off-off-on. If we think of an
ōoffö as a zero and an ōon" as a one,
the pattern looks like this: 10000001.
Remember that everything your TI-99/4A does is based on groups of
binary numbers like that. Each 1 or 0
is called a ōbitö In addition, every
pattern of ones and zeros has its own
binary value.
Learning to count in binary is
beyond the scope of this article, but
there are a number of books or articles
around that can teach it to you. What
you should know for now is that each
letter and character has its own pattern
of zeros and ones and its own binary
value. In order to make it easier to
communicate with a computer, the
bits are grouped into groups of four.
Two groups of four bits is called a
ōbyte.ö A byte can contain 256 differ-
ent combinations of bits (or values)
and has enough combinations to allow
a unique pattern for each letter, number
and character on your keyboard. For
example, the 65th possible pattern (a
byte value = 65) represents the letter
ōAö in the ASCII character coding system used by the Tl-99/4A and most
computers. This means that 65 is the
ASCII value of the letter ōA" That is
why the computer will give you back an
answer of 65 if you ask for the value of
ASC(öAö).
To make a word, the letters are
strung together (just like in English).
When you type in a word as part of a
TI BASIC program, the computer will
convert each letter in the word into a
byte and make sure that this particular
grouping of bytes makes sense. For
example, if you type in GOTO on the
keyboard, the computer will read that
as 7l 79 84 79.
In order to read data from a tape recorder, your computer will have to be
able to read in bytes of data. That
means that it will have to understand
ōoffsö and ōonsö when listening to the
tape. Unfortunately, there is no such
thing as an ōonö or an ōoffö to a tape
recorder. Even when it is absolutely
quiet to your ears, a tape contains some
amount of noise. So we canÆt say that
no noise = ōoffö and noise ōon"
Instead, we need another way for a
tape recorder to communicate an
ōoffö or ōonö to the computer. This is
done by using two tones, each at a different frequency. The lower frequency
tone can then mean ōoffö and the
higher frequency tone will mean ōon."
If your tape recorder cannot record or
playback the higher frequency, your
computer would only hear ōoffs"
Only these two tones are recognized
by the computer. If it ōhearsö any other
tone, your 99/4A will ignore it. Of
course, TI has added some tolerance to
the computer so that if it hears something almost like the ōonö or ōoffö
tone, it will accept it as an ōonö or
ōoff.ö This means that for your 99/4A
to properly read data from a cassette
recorder, the tone must be both loud
enough (i.e., the volume set high enough)
to be heard and also be at the right
frequency.
Not all Recorders Are Equal
A principal law of physics states that
it takes more power to produce or
reproduce a high frequency than it
does to produce or reproduce a lower
frequency tone. If the volume is not
high enough during either recording or playback, your computer wonÆt
hear anything, or it might not be able to
hear the higher frequency tone. Alternately, it may hear all of the lower
frequency data tones that mean "off:
but only hear part of the higher frequency tones that means ōonö In order
to help the TI-99/4A hear the high
frequency tones properly, the tone control knob on the recorder should be
set at or near the maximum level. Even
if this is done, some tape recorders
cannot handle the high frequency. If
your recorder doesnÆt have a tone
control thereÆs a good chance it was
probably meant to handle only the frequencies of human speech and wonÆt be
mechanically able to handle the high
frequency tone at all.
Since it is possible that your recorder
cannot reproduce the high frequency
tones properly, your computer has to
be sure that it has read all the data. How
can it make sure that nothing was lost?
Your computer counts the number of
ōonsö that it heard. After every so
many bytes, it expects to read a number
on the tape. This number tells the computer how many ōonsö it should have
read. If the two numbers donÆt match,
a ōparity errorö has occurred and the
computer will tell you that you have a
problem.
Now suppose that the volume is set
high enough to reproduce the high level
tones, but is up too high? Well too
much volume causes distortion in a tape
recorder. This distortion will mean that
some of the tones will not be heard
accurately by the computer at all. ItÆs
just like someone screamed in your ear.
You know something was said, but you
donÆt know what it was.
LetÆs recap what we just learned. In
order for your computer and the tape
recorder to communicate properly,
three things must happen:
FirstŚthe tape recorder has to be able
to handle both the high and low frequency tones and it must be capable of
reproducing them within a small range
of the frequency at which it was recorded. In order to record and playback
the higher frequency tone it is usually
necessary to have the tone control of
the tape recorder set at, or near maximum.
SecondŚthe tape recorder must be capable of small volume adjustments so
that you can reach a condition where
the volume is loud enough to be heard
by the computer and yet low enough so
that there is no distortion.
ThirdŚthe tape recorder must be able
to record and playback the very quick
shifts in frequency (from ōoffö to
"onö) accurately so that no tone is
lost when being played back into the
computer.
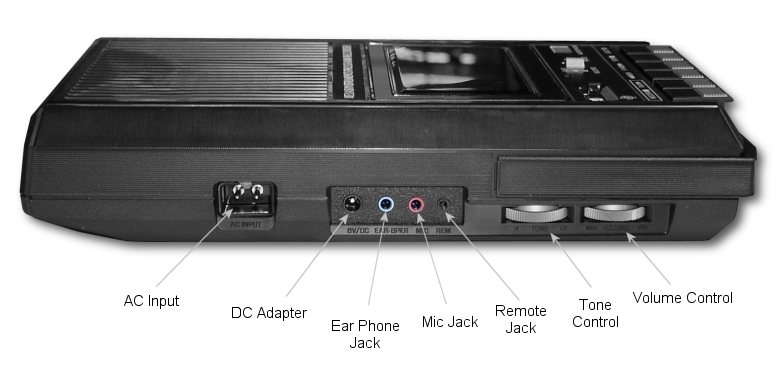
A Remote Possibility
There is one additional problem that
may crop up even with tape recorders
that satisfy the above criteria: Almost
all cassette recorders have a remote
control jack which allows you to stop
the recorder by pressing a button or
switch located on the microphone.
Unfortunately since this jack is meant
to work with the manufacturer's own
microphone, there is no guarantee
that the jack is hooked up the same way
in each tape recorder. In fact, there is
a 50-50 chance that the tape recorder
model you buy or already own will not
be compatible with the system your
Tl-99/4A is expecting. This means that
the drive motor of your recorder might
not be capable of being turned on and
off automatically by the computer
when the plug on the TI cable is inserted
into the recorderÆs control jack. Luckily,
if this is true for your recorder, 99Æer-ware sells an inexpensive adapter (called
ōTI-SETTEö) which is used between
your recorder and the TI cable. If you
donÆt want to spend the money for this
adapter, you can get by without, by
manually starting and stopping the
tape, except if you intend to use
cassette files, in which case the auto-
matic operation is necessary.
The conclusion you can draw from
all this is that your Tl-99/4A requires
a tape recorder with specific attributes
in order to consistantly guarantee good
results. TI provides its owners with a
list of 2-6 tape recorder models that
work well with the 99/4A computer. If
you do not already own a recorder, I
strongly suggest that you buy one of the
recommended models. If you do have
a recorder, you can try it out before incurring the expense of purchasing a new
one.
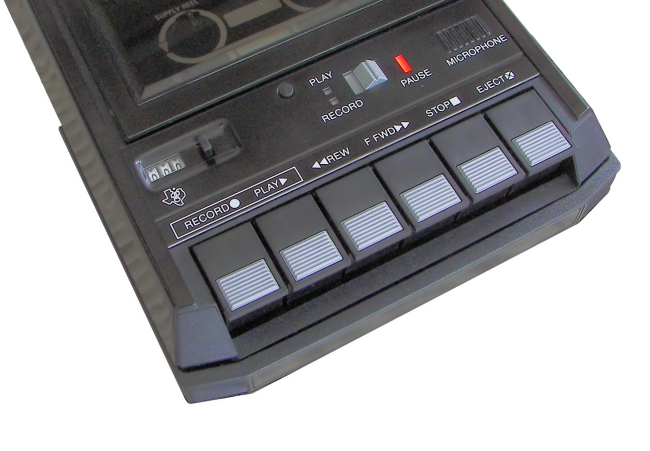
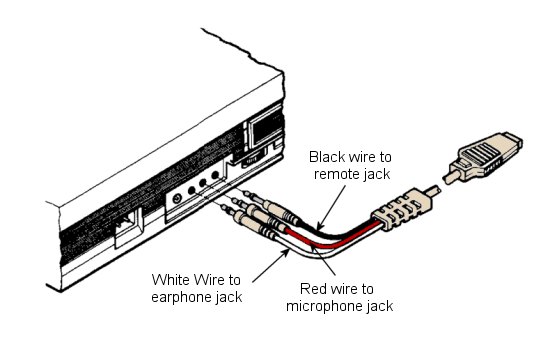
Plugging In!
Now that we have discussed why
some recorders wonÆt work at all or
wonÆt work with the remote control
jack plugged in, letÆs get down to business. Shut off your machine and plug
the wide cable (with 9 holes in it) into
the hack of your computer. The other
end of the cable has two cords. One
cord has three plugs attached (labeled
plug #1), and the other (plug #2)
has only two. The tape recorder that
you connect to plug #1 will be called
ōCS1ö by the computer. If you are
lucky enough to have a second usable
tape recorder, you can hook up that
one to plug #2. It will he called ōCS2ö
by the computer. Just follow the installation instructions printed on the
card that came with the TI cassette
cable. If your tape recorder does not
have a remote control jack, just ignore
the instructions to insert the black
plug. Note that CS2 does not have a
playback plug. You can only record
on CS2.
Plug the tape recorder into an
electrical outlet and you are now ready
to check out your system. A battery
operated tape recorder is usually too
unreliable for recording and playing
back data for your computer because
of the fluctuations in speed and amplifier gain. Load a high quality
(remember we have to record those
high tones accurately!) C-10, C-15,
or C-30 blank tape into the tape recorder. The number part of the tape
code gives the number of minutes of
recording time available on both sides
of the tape. A C-10 tape has 5 minutes
of recording time on each side. You can
use a tape as long as a C-60, but never
anything longer. This is because longer
tapes are thinner, stretch more, and may
not maintain proper speed in the recorder. For this first test, make sure the
tape is completely blank. Turn on your
computer and get into TI BASIC. Key
in the following 4 line program:
100 PRINT ōHELLOö
110 I=30
120 PRINT ōMV VALUE ISö;I
130 END
Turn up the volume on your TV (or
monitor) by a few notches so that you
can hear a slight hum. Set the volume
control on your tape recorder mid-way
between the lowest and highest settings.
Set the tone control (if there is one) up
to maximum. Now type in SAVE CS1
and press the ENTER button. Follow
the instructions that the computer gives
you to rewind the tape and begin recording. When you press ōrecordö on
your tape unit and then press the
ENTER button on the computer, the
tape should start moving.
If the tape doesnÆt start moving, you
have a non-compatible remote control
jack. If this is the case, wait for the computer to get out of recording mode and
print the ōVERIFY (Y/N)ö message.
When it does, type in an ōN". Now
remove the plug from the remote
control jack and begin the recording
process all over again (by typing SAVE
CS1 and pressing the ENTER button).
When you are told to record, you
should now see the tape moving.
Getting Adjusted
After a short pause, you will actually
hear your program being recorded onto
the tape. The recording consists of an
initial long phrase of a single tone,
followed by bursts of sound with a very
short pause between bursts. This initial
tone is used to tell the computer on
playback that data is coming. This tone
is recorded before each program and
each block of data (which we will talk
about later). When the recording is over,
you will get the verify message (see
above). Type in a ōYö (you donÆt have
to press the ENTER button). Follow
the instructions about rewinding the
tape. When you play back the tape,
listen to the sounds that it is making.
Note that the volume is much louder
than when you recorded. If that initial
tone does not sound pure (it seems to
warble with the tone going higher and
lower), you are probably using a recorder that wonÆt work well consis-
tently. If the tone does seem pure,
youÆre halfway home!
When the tape goes silent, the program has finished loading. You should
get a message that says either ōDATA
OKö or ōERROR IN DATAö. If no
message prints, then the volume setting
was too low and your computer is still
waiting for the first recognizable byte of
data. It will eventually get tired of
waiting and give you a ōNO DATA
FOUNDö error. Just wait for this
message to appear, or shut off your
computer and start all over again.
If you got the ōDATA OKö message,
you are home fre& Relax and go on to
the next paragraph. If you were unlucky
enough to get a ōNO DATA FOUNDö
error, turn up the volume one notch. If
you got the ōERROR IN DATAö message, you probably had the volume too
high. Lower the volume one notch. Write
down the latest notch on a piece of
paper. In either case, respond to the
computer question by entering an R to
re-record. The computer will guide you
in another recording session. Keep repeating the process until you canÆt
change the volume any further, or the
ōDATA OKö message appears, or the
error message has changed (i.e., from
ōNO DATA FOUNDö to ōERROR
IN DATAö). If you canÆt change the
volume any further, your recorder
just isnÆt good enough. DonÆt aggravate
yourself, any longer, go out and buy
one from the list. If the DATA OK message has appeared you are in good
shape. If the message has changed, back
off your last change by half a notch.
For example, if moving the control
from 6 to 7 made the ōERROR IN
DATAö message appear, try the recording process again at 6 1/2. If that doesnÆt
work, try it at 1/4 notch intervals. If that
doesnÆt work, forget it. Buy a different
recorder.
After you get the ōDATA OKö
message, mark the volume setting in
some way. I usually dip a toothpick in
white paint (a light nail polish will also
work) and dab a line on both the recorder and the control so that I can
easily see that the volume setting is
correct. You now have a functioning
cassette tape system and are ready for
bigger and better things!
Better Safe than Sorry
When you entered the SAVE CS1
command, you told the computer to
copy the bytes that represented your
program inside the computer onto a
tape. The entire program is saved each
time. Your program is still in the computer, however. If you agree to verify
your tape, TI BASIC will read in the
tape and compare it in a byte-for-byte
manner with the program still residing
in memory. Unless the two match
perfectly, your 99/4A will issue a
warning that you have a bad tape.
ALWAYS VERIFY ANY SAVEs BEFORE ENDING A PROGRAMMING
SESSION!
The tape version of the program is
saved in a ōmachine image" format that
is meaningful only to TI BASIC. You
cannot, however, write a Tl BASIC program that will read this tape. The only
way to get your program back into the
99/4A is via the OLD CS1 command.
This will load the program back into
the machine. Anything that may have
been in the computer before the OLD
CS1 will be lost. By the way, you can
SAVE CS2 (if you have a recorder
hooked up to cable #2) and then read
in the tape by entering OLD CS1. Of
course, you have to move the tape over
to the recorder attached to cable #1
first!
The instructions built into the TI-99/4A whenever you enter the SAVE
CS1 or OLD CS1 command assume that
you have only one program per side of
tape. In reality, you can save more than
one program per side. A long program
will require about 3-4 minutes of recording time. This means that it is
possible to save about 4-5 programs on each
side of a C-30 tape. If your recorder has
a tape counter, just keep track of where
the next free space on the tape is located. Then, when the computer tells
you to rewind the tape, just fast-forward
to that next free spot on the tape instead. Just make sure to keep a log of
what programs are recorded on a tape
and where they are located. If you
donÆt want to be bothered by this, and
want maximum, reliability, it is better to
use C-10 cassettes and record only one
program per side.
A cassette tape recorder will usually
have the ability to record a new program directly over an old one. It is
good to get into the habit of completely
erasing a tape, however, when you no
longer need it. This ensures the best
possible recording the next time you
use the tape.
Filing Data
The cassette recorder also makes a
handy data storage device for use in
your computer programs. Suppose that
you have written a program to keep
track of the bowling scores and figure
out the handicap of each member of
your bowling league. You donÆt want to
re-enter this information each time you
run your program. What you need is
a way of saving the data when you are
through with it so that it can be read
in the next time around. Some people
do this by coding in the information in
DATA statements each time before
SAVEing the program. A better way of
doing this is to write out a small ōfileö
of data onto a tape. Your program can
then read in this data the next time it
runs. TI BASIC has an easy way of
doing this by using the INPUT # and
PRINT # statements.
Before you can read or create a file,
you must tell the computer a little
about your file. This is done by the
OPEN statement. Your reference
manual does a pretty good job of explaining this statement, so IÆll just go
over the parts specifically dealing with
cassette tape files.
Unlike the SAVE command which
writes out your entire program as a
large ōchunkö of data, BASIC data
files can only handle small chunks
of data, called ōrecords,ö at a time.
Each file can contain 1 or more records.
All cassette records in a file must be of
the same size. They can all be 64 bytes
(characters) long, 128 bytes long, or
they can all be 192 bytes long. You can
specify other lengths as part of the
OPEN statement, but TI BASIC will
boost the number up to either 64, 128
or 192. If a record you want to write
is shorter than the length that you
specify, TI BASIC will add enough
blanks at the end of the record to make
it the right length.
Each record can contain as much
data as you can fit in that size record.
When you have a statement that says
PRINT # and ends with a semi-colon,
BASIC will add that data to the record,
but will not write anything out to the
tape. When BASIC sees a statement
with PRINT # that doesnÆt end with
a semi-colon, it will write out everything in a record (including this last
piece of data) to the tape. When the
record is written to tape, it is preceeded
by the same steady high-pitch tone that
starts off a SAVE. That means that
BASIC uses a lot of tape to write a
single record. In fact, if you use records
that are only 64 bytes long, it is possible
that more room is spent on the tape for
the start tone then is used to record the
data! Remember that more room on
the tape means slower reading by the
computer. ThatÆs why I usually use 192
byte records and try to fit as much data
as possible into each record. Doing this
will cut down on the number of records
written to tape, and make the program
run faster.
Since TI BASIC only writes to
tape when you tell it to, the computer
must have total control of the cassette
recorder so that it can start and stop the
recorder as needed. This means that the
black remote-control plug must be in-
serted (and functional!). If your remote
jack is notcompatible with the Tl-99/4A,
you will not be able to use the recorder for saving and reading data under
program control. This is where the
TI-SETTE Adaptor, listed at the end
of this article, can help.
You can store in two different
formats. DISPLAY format means the
data is saved just the way it would look
in a DATA statement. INTERNAL
format saves the data in the same way
that the computer stores the information internally. Numbers require 8
characters (bytes). Strings (i.e., names)
require 1 byte (for the length) plus the
data itself. I usually save my data in
INTERNAL format so that I know the
length needed for numbers no matter
how big or small they are.
The BASICs of Record Keeping
LetÆs write a part of a program that
will save each bowlerÆs name, his pin
average and his handicap. Pretend that
we have 60 bowlers in our league. If we
restrict each bowlerÆs name to a maximum of 47 characters, we will need a
total of 64 bytes per bowler (47 bytes + 1 48 for the name + 8 for the average + 8 for the handicap 64). We can
therefore fit the data for 3 bowlers into
one 192 byte record.
090 REM ROOM FOR 60 BOWLERS NAMES, AVERAGES, HANDICAPS
100 DIMENSION B_NAME(60),B_AVG(60),B_HANDI(60)
995 REM OPEN THE FILE FOR OUTPUT
1000 OPEN #1:öCS1ö,OUTPUT,INTERNAL,SEQUENTIAL,FIXED 192
1010 X=l
1020 FOR 1=1 TO 60
1025 REM SEE IF RECORD IS FULL
1030 IF X=3 THEN 1100
1040 X=X+l
1050 REM ADD TO RECORDŚ BUT DONT WRITE IT OUT
1060 PRINT #1 :B_NAME(I) B_AVG(f)B_HANDI(I);
1070 GOTO 1120
1090 REM ADD TO RECORD AND WRITE IT OUT!
1100 PRINT #1 :B_NAME(I);B_AVG(I);B_HANDI(I)
1110 X=1
1120 NEXT I
1130 CLOSE #1
If you have filled up a record by the time
the program hits the CLOSE statement,
TI BASIC will fill the record with
blanks and write it out. You do not
have to worry about writing out a last
record that is partially full. Just remember to always code in a CLOSE
statement. To read the data file into your
program, you need code that almost
duplicates the write code.
195 REM OPEN THE FILE FOR INPUT
200 OPEN #1:öCS1ö,INPIUT,INTERNAL,SEQUENTIAL,FIXED 192
210 X=1
220 FOR 1=1 TO 60
230 REM SEE IF RECORD IS FULL
240 IF X=3 THEN 300
250 X=X+1
260 REM READ RECORD-- BUT DONÆT READ TAPE
270 INPUT #1 :B_NAME(I);B_AVG(I);B_HANDI(I)
280 GOTO 320
290 REM READ RECORD AND GET NEXT TAPE
300 INPUT #1 :B_NAME(I);B_AVG(I);B_HANDI(I)
310 X=1
320 NEXT I
330 CLOSE #1
Note that statement 300 reads in the
last piece of the record and tell TI
BASIC to read in a new tape record
the next time it sees a READ #1
statement.
When your program hits the OPEN
statements, it will issue commands
about rewinding the tape and pressing
ENTER. Just before it reads the first
record, the screen will scroll up one line
to indicate that it has begun processing
the tape.
I have often been asked why TI
provides the CS2 plug. I have to admit
that most manufacturers do not provide
dual cassette support. It is useful if
you must process more data in your
program than the computer can handle
inside its memory. You would need two
recorders hooked up, and would read
in as much data as possible (for example,
as file #1) on CS1, then do whatever
you have to, and finally write the updated data out on CS2 (as a different file
number). You would then go back and
read in the next batch of data from
CS1, update it, and write it out. You
repeat this until there is no more data
on CS1. This allows a small computer
to handle very large files.
At this point you should have the
basic knowledge for choosing a cassette
recorder, and getting it to work with
your computer. Keep in mind that
tape storage transforms your Home
Computer into a very powerful and
versatile machine. And once you get
familiar with the few simple procedures
and precautions, each occasion of saving
and loading programs and data files will
become second nature, one might
even say, ōfilled with memories . ."
|