 |
Clearer Display (Capacitor Fix)
|
 |
 |
This project will help clear up the screen display. The above pictures show the results, the left being a "before"
shot, and the right side shows the "after" shot. Keep in mind that the above are graphics that I created to show
what you might expect when completing this project, and not actual screen shots. We are all familiar with the white shadows that surround the text
on a TI display, this project reduces those shadows quite a bit.
This project appeared in the February 1991 Micropendium by Earl Raguse of the User Group of Orange County, and
According to Earl the TI console puts out a spurious signal that causes a "ringing" on the monitor
screen. The will cause the "famous" white shadows around images on the monitor.
It was also pointed out to me that this project also appeared on page 9 of the R/D Computing Newsletter from May/June 1986 in an article attributed to Marv Shuldman from New Jersey with this same modification.
I must agree, I did notice a change in the picture quality. I found that this "fix" did more "fixing" then the
display fix with the resistor. I haven't tried both together but hope to soon.
|

|
|
Please make sure that all wiring and soldering is double checked before re-applying power. Though computer components are pretty hardy some do not take to being
wired up backwords or incorrectly. I have done my best to make sure that all diagrams
and instructions given here are correct, but I can not be responsible for any damage
an incorrect upgrade might cause. Also keep in mind that this will probably void any warranty :>).
|
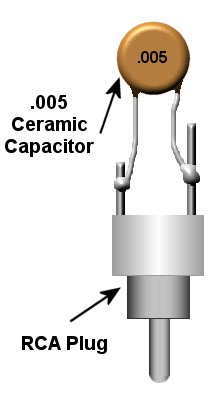
The nice thing about this project is that you do not need to open the console to use it. The parts required are:
1 .005 MFD Ceramic Capacitor Radio Shack # 272-130
1 RCA Phono Plug
1 RCA-type monaural "Y" cable
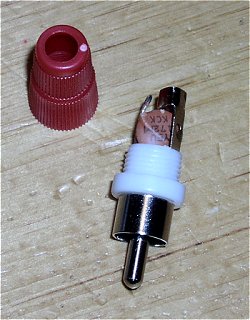
The above picture shows the capacitor soldered to the RCA phono plug. I then tucked the capacitor down into
the plug so that I could screw the phono plug's cap on. The below picture shows this.
|
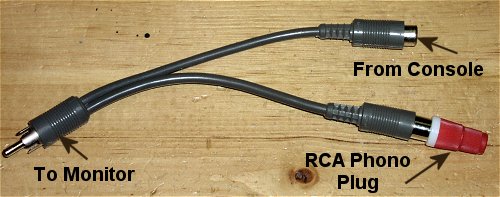
The above picture shows how to use the "Y" cable. After hooking everything up and turning on the monitor and
console you can pull the phono plug off and on and notice the difference.. I was quite pleased.
|
